
This is a hugely powerful LED made from a 100 x 1 W LEDs. To paraphrase Crocodile Dundee: “That’s not a LED, THIS is a LED!” “Continue reading” for more details and photos.
Here the battery powered LED, balanced on a fence post, lights up a lighthouse.
Lighting a lighthouse! It cost AUD$500 from China in 2009. It produces 7000 lumens and runs on 34 V 3.2 A. It needs to have a heatsink capable of perhaps 90W. The Bunbury lighthouse is on but you cant see it’s beams easily in the photo from this angle. The 100 Watt LED runs on three 1.3 AH, 12 V SLA batteries attached to the LED which is resting on on the wooden fence here. It is fan cooled and runs around 3 A 34 V via a 0.4 ohm resistor, if I recall.
 If you look closely, you can see the bonding wires for each row of 10 LEDs. So lets turn it on and increase the power slowly.
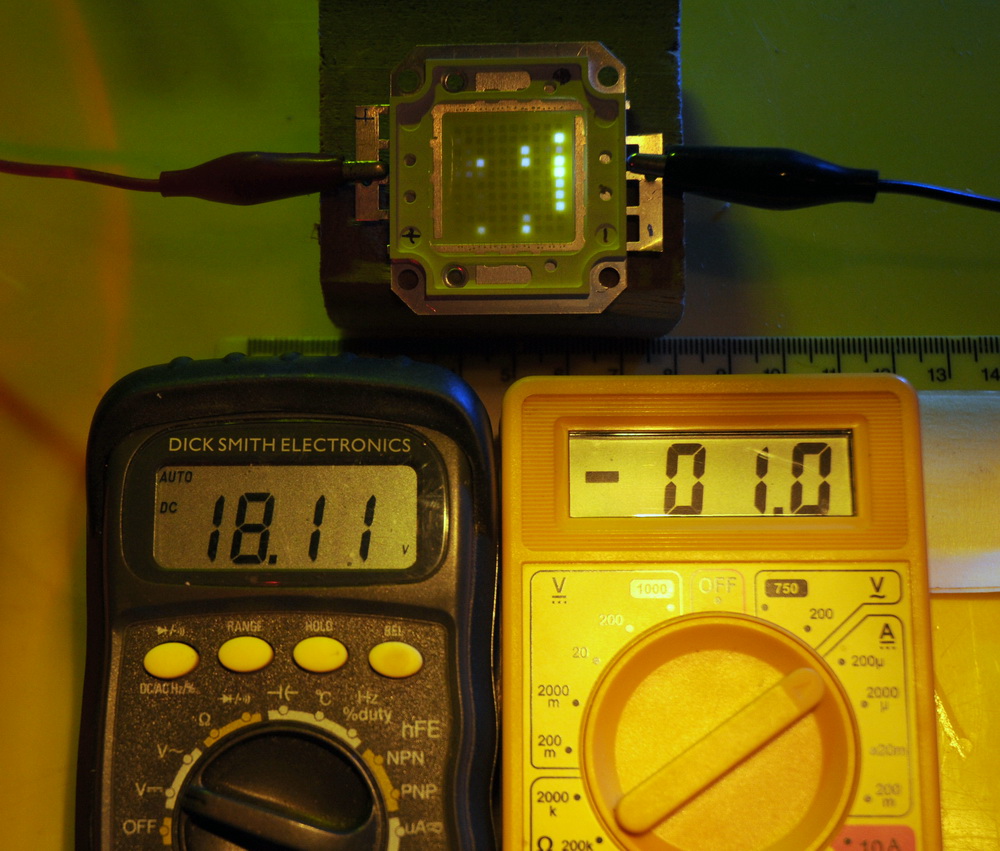
Below is a series showing increasing current from 0.1 uA, 1 uA, 1 mA, 100 mA in turn. Voltages range from 16.36 V up to 27.61 V.
 Above, the first faintly lit segments at a minute 100 nA. Power is hence 1.6 uW. Note that this is 19 second exposure to pick up extremely faint events.
 At 1 uA more LED detail is visible.
 Above: up to 1 mA.
But what about the irregular lighting at low powers?
 Above at 10 mA. I was particularly worried about the row where the rest of the LEDs are brighter suggesting the dead segment is a short circuit.
 Above shows a power of 100 mA and power to the LED is now 2.7 W. Things are very bright now and the LED is covered by dark glass from welding goggles and is 1/160th sec. All segments are now lit equally. I was worried for a while.
 Above shows full power of 100 W through a 400:1 variable density filter. The corner is not lighting up well but the coating is a bit opaque there. Presumably due to overheating as this photo was taken years later in 2014 after 5 years of abuse.
Now this LED will dissipate about 90 W of heat and needs a heatsink. I was being a bit optimistic with this one but it was on hand.

 Above shows a small CPU heatsink bolted to the back of the LED.

My infrared thermometer reading 51 C after a short run with the small heatsink. The LED is rated at up to 80 C operating.
![]()
Specifications:
Long lasting (Last up to 100,000 hours),
More energy efficient than incandescent and most halogen Lamps,
Instant Light (Less than 100ns),
High ESD Protection (More than 3 KV), No UV emission
Source Material: InGaN
Emitting Colour: White
Luminous Intensity: Min:6400 lumens Max:7400 lumens
Reverse Voltage: 5.0 V, DC Forward Voltage: Typical: 32 V Max: 36 V
DC Forward Current: Typical: 3000 mA Max: 3500 mA, Viewing Angle:160 degree
Lead Soldering Temp:260°C for 5 seconds
Size of led: 40 mm X 46 mm
led emitter size: 21.5 mm X 21.5 mm Viewing Angle:160
*Absolute Maximum Ratings at Ta=25°C:
Power Dissipation Pd 125 Watt
Peak Forward Current (1/10 Duty Cycle,0.1ms Pulse Width)
IF(peak) 3500 mA
Continuous Forward Current IF 3000 mA
LED junction temperature JT 85 °C
Reverse Voltage VR 5 V
Operating temperature range
Topr -20°C to + 80°C
Storage Temperature Range
Tstg -30°C to + 100°C
*Electrical/Optical Characteristics at Ta=25°C:
Luminous flux ф IF=3000mA 6400 – 7400 Lumens
Viewing Angle 2θ1/2 IF=3000 mA 160 deg
Forward Voltage VF IF=3000 mA 32 – 36 V
Reverse Current IR VR=5 V 100 uA
Color Rendering Index Calculation Spm X 0.280 – 0.340
Spm Y 0.280 – 0.340
Correspondingly CCT IF=1500mA 5500 6500 7500 K


 Above shows a comparison with a standard candle at 10 mA, 100 mA, 1000 mA and 2,700 mA. Painfully bright and swamps the candle for photographic reference.

 The left photo above shows my shed lit with the LED plus a 150 W incandescent globe for comparison. The right photo shows it held up to the sun.
These LEDs are designed for street lighting. Many US cities including LA and NY are doing feasibility studies on replacing their 100,000 plus streetlights. These would replace low or high pressure sodium lights or metal halides. Low pressure sodium is unpleasant because of the monochromatic yellow but very efficient. High pressure sodium is more white but less efficient. Some comparative information on luminous efficacy is here. LEDs are about as efficient but have lower maintenance. There are other advantages in smaller packaging and better beam direction to reduce wastage. For example there are different beams for a street than an intersection or junction. All this does stack the data in favour of the LED. Cost being the main difference. A range of streetlights is here up to arrays of 200 W. Different colors up to 500W here with 20,000 lumens. And cheaper 100W LEDs at $118 here (2009).


 I built it up into PVC tubing (above) with a rectangular connection that just nicely fitted the heatsink/fan. I used a CPU fan of medium size as the last one was nowhere near good enough. This one seems to keep the temp down to perhaps 42 C. I was making the black housing to accommodate 3 SLA 12 batteries. Then I thought it might look interesting as a mechanical arm attachment vaguely reminiscent of Iron man or one of the Transformers (robots). You can see how bright it is in sunlight on my arm. I was rushing to finish this portable full power version by Earth Hour so I could turn off the lights (briefly) while I had a group of photographers here during a Tesla session.

 The left photo above is the LED on the left in comparison with a 500 W halogen floodlight on the right. Beam coverage is similar or better and it looks brighter to me particularly when you look at the shadows. LED is running on the battery pack at perhaps 75 W. The right photo shows the LED in comparison with car headlights on high beam (100 W halogens each). Beams are very different but LED is easily brighter.

 Above is the LED shining through a 180 mm camera lens which projects a very clear image onto the corrugated shed wall. You can see great detail with the 30 times magnification including the bonding wires and chip details. One can even pick out the light from a single segment with an additional lens like this “crystal ball”.


 Above is the LED on the left It so happens that the chip light is in a “3” shape brought out with contrast adjustment. One of the individual LEDs is marginally brighter or in better focus and stands out unusually.

 Above is the LED with a focusing lens. I have played with a lot of random lenses, spherical mirrors, Fresnel lenses and glass spheres out of my optics box but have no idea what I am doing. The best performance was with a magnifier used for looking at skin lesions and I have bolted this to the LED. It is close and broad enough to capture a reasonable proportion of the light output as given by the light output curves.

 Above is the LED on my bike with the focusing lens. It makes my very adequate 3 W LED bike headlight look rather puny. It’s like having a new weapon on your space fighter. Now, let’s go and use it irresponsibly…


Above: The normal 3 W LED on my bike with the lights of a passing car just as it is about to pass me. Then the same with the 100 W LED.


 To test the infrared output, I used a special infrared filter (specs here). By connecting it to my silicon photodetector cell in the center photo, I got 9 mV of infrared only output. On the right photo without the filter I get 425 mV which is total output. Hence the infrared is only 0.5 % of total output. Similar readings on an incandescent globe give about 92 % infrared. What this means is that the incandescent globe puts out much more total radiation but most of it is in the infrared. The globe radiates the heat whereas the LED puts it into a fan cooled heatsink.
The 100W LED article has done reasonably well in the media. It got 100,000 hits after it was slashdotted and made it to 80 websites. These are shown on the Backwards links page – search with (control F) for 100W LED. Was popular on cycling, LED and scuba forums.
![]()
Related pages

Try something else

External links
Photo Date: March 26, 2009